- PATTERNS
- VIDEO TUTORIALS
- BLOG
- FEEDBACK
- CONTACTS
- FAQ
- Main page
- Blog
- Sewing with GRASSER patterns
- Sewing pattern № 488 dress with Maya Marennikova
Sewing pattern № 488 dress with Maya Marennikova
A detailed, informative and step-by-step master class on tailoring a dress from Maya Marennikova @maya_sews :
Hello friends!
It's summer outside the window and I wanted to sew something like that, unusual, a little rebellious, but at the same time girly. :)
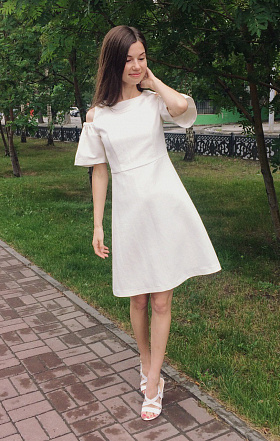
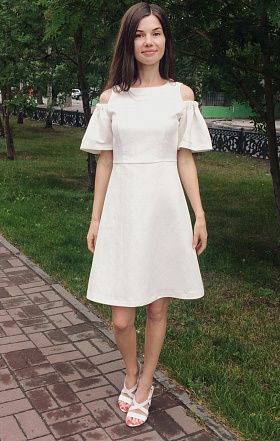
My choice fell on a pattern # 388 dress: open shoulders, puffed sleeves, a flared skirt – just what I need!

I chose cotton jacquard for sewing the dress: the fabric is dense and keeps its shape well. The fabric consumption was 1.3 meters per 40 size. I did not cut facing, but put the dress on the lining (1m). We also need woven or non-woven interfacing, 55 cm invisible zipper, 2 cm wide elastic band (about 50 cm long) and threads matching the fabric. Let's get started!
We print the pattern, tape the sheets and cut out the patterns. We prick the patterns on the fabric, following the direction of the grain line, mark with chalk, transfer all seam numbers to the fabric and cut out dress pieces.

Now we can start sewing!
We pin the central and side parts of the forepart together, aligning the seam numbers, and sew together.

To make the steaming of the bodice seam line easier, first I iron the seam, then iron it out, and finally iron it to the forepart center – and we get a perfectly ironed princess seam. :)


We do the same with the back pieces.
The next step: we stitch the front gore of the skirt to the front bodice, and the pieces of the back skirt to the pieces of the back bodice.

Now we connect the shoulder seams, merging front and back princess seams together.


Let's start inserting the zipper.
First of all, it is necessary to glue the place where the invisible zipper is inserted with woven or non-woven interfacing: cut out a 3 cm wide strip and a couple of centimeters longer than the zipper, then glue it with an iron.
Then we insert invisible zipper.

To make it easier to merge the waist seam on both halves of the back together, take the following steps:
-
Sew one part of the zipper to the left half of the back
-
Close the zipper, put a mark on the second half zipper tape on the waist seam line
-
Attach the waist seam of the right half of the back to the mark and sew it only in this place
-
Close the zipper and check the alignment
-
Sew the right half of the zipper completely
Now we pin the back seam and start stitching exactly from the place where zipper stitch ends.

Then we sew the side seams together, checking the alignment of the waist seam.


Now we move on to the sleeves
This knot is the only one that I made changes to. Since my fabric turned out to be too dense and was stiff as a board, the sleeve in its original form was too fluffy. I decided to narrow the sleeve on each side by 5 cm and shorten it by 3 cm, as shown in the photo.

Further we whip stitch the upper edge of the sleeve to the sleeve piece. Iron the allowances for the facing and stitch by 0.1 mm.


Now we need to fold facing bottom edge piece and stitch it onto the sleeve.


We insert an elastic band into the casing, fix one end by stitching it to the allowance.


Then we tack the sleeves, try on the dress and adjust the length of the elastic.

Having clarified the length of the elastic, we stitch its second end to the allowance and cut off the excess part.

We hem the bottom seam of the sleeve and the bottom of the sleeve. I sewed it with a blind stitch on a sewing machine using a special foot.
We do the same thing with the second sleeve.
Now we attach the sleeves to the armhole. In order not to mix them up, pay attention to the seam numbers: the notch on the sleeve facing is located on the front of it.

As I mentioned before, I have a lining instead of facing, so let's move on to assembling!
I cut out the lining exactly according to the top pieces and completely assembled it, including stitching the side and shoulder seams.
Now we process the dress neckline with lining. Fold the dress top and lining face to face and stitch. At this stage, I processed exactly the neckline, and did not stitch the lining to the middle seam allowance of the back, as this would make it difficult for me to access the armhole. This is how it looks:

Now we whip stitch the armholes.
We do it in two steps: from the shoulder seam to the place where the sleeves are sewn in on the back, then from the shoulder seam to the place where the sleeves are sewn on the forepart.


I also finished the bottom of the armhole with a lining, stitching it exactly into the sleeve head seam.


In the rounding place, we slightly cut the allowances and stitch them by 0.1 mm on the lining (facing).
We overstitch with slanting stitches and iron.
The lining can now be stitched to the center seam allowances of the back. We sew close to the invisible zipper.
Then I stitched the middle lining seam below the zipper. Hemmed the bottom of the lining: tucked it in and stitched it. And I hemmed the bottom of the dress with a blind stitch, like the bottom of the sleeves.

Hooray! The dress is ready! We carry out the final ironing of the garment and go for a walk in a new dress!


Reviews
All documents, multimedia and texts posted on en-grasser.com are works of authorship and are the property of Grasser Group Limited. All the information and products are provided to buyers for personal use. Resale of patterns and master classes is prohibited and prosecuted by law. Public offering of our products and links to their downloading - on the Internet, social networks and in the media - is a violation and carries a penalty in accordance to applicable law. When copying text information, an active link to en-grasser.com is required. Every copy from the site en-grasser.com is tracked.
CallbackContact usAuthorizationPlease register or login AuthorizationSubscribeAre you sure you want to remove an item from your shopping cart?


Hi there!
I really like the open shoulders and the flared skirt!. But for me it's also a great look for Sunday church service. Using cotton jacquard was a great choice; so I'll try to make this with the same fabric. Plus, I also appreciate the specifics on materials needed; it made my trip to the store much easier. The dress suits you SO well.
Администратор: Hello! Thank you! We are very happy that you like our dress.
We wish you pleasant tailoring and a beautiful new product!