Mastering Cami Sewing Patterns: A Comprehensive Guide for Modern Sewists

Sewing a camisole top is one of those projects that feels like a little gift to yourself. It’s a chance to create something that’s all about your style, and comfort. Whether you’re dreaming of a breezy summer top or a sleek layering piece to wear under a blazer, camisoles are endlessly versatile. With the ease of grabbing a cami top pattern PDF online, you can dive right in. This guide is here to walk through everything—picking fabrics, mastering construction, adding your personal flair—so you end up with a cami that feels luxurious yet effortless.
Why Cami Tops Belong in Every Wardrobe
Cami tops have been around forever, starting as simple undergarments, and blossoming into must-have wardrobe staples. Their charm lies in their clean design: sleeveless shapes, thin shoulder straps, soft, flowing lines. They pair beautifully with high-waisted jeans, a crisp blazer, or even a skirt for a dressier vibe. What we love about cami sewing patterns is how they take this timeless piece, and add modern twists—think adjustable straps, bust darts for a flattering fit, or even sneaky welt pockets.
If you’re new to sewing or just want a fresh project, Grasser’s website makes it easy. You can find a cami top sewing pattern that you can download as a PDF, which is a total game-changer. It’s beginner-friendly with clear steps, but there’s room to play if you’re more experienced—maybe try French seams or a silky lining. A well-made cami can go from a lazy coffee run to a chic night out without missing a beat.
Crafting a Professional-Quality Cami: Step-by-Step Insights
Fabric Choices: Balancing Form and Function
Your fabric sets the tone for your cami—its drape, its durability, and how it feels against your skin. Here are some favorites I’ve worked with:
-
Lightweight Cotton: Crisp and breathable, it’s go-to for summer tops with structure. Prewash it (especially if you’re using fat quarters) to dodge shrinkage later.
-
Silk or Satin: These scream elegance but need a gentle touch. Use sharp needles to avoid snags and maybe add a lining for extra polish.
-
Jersey Knit: Stretchy and cozy, perfect for a snug fit. Pair it with a ballpoint needle and a walking foot to keep those side seams smooth.
-
Rayon or Viscose: These drape a dream but fray easily, so finish the edges with bias tape or an overlock stitch.
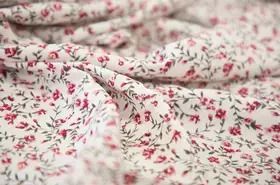
Pro Tip: If you’re using bold prints—florals, stripes, whatever—line them up at the side seams while cutting. It makes the finished piece look so put-together.
Accuracy in Pattern Preparation
Everything begins with a well-constructed cami pattern. On this website, you can download a PDF pattern for a cami top from Grasser—it comes with precise scaling and instructions that don’t leave you guessing. Here’s how to set yourself up for success:
-
Measure Twice: Check your bust, waist, and hip measurements against the size chart. Getting the right size is half the battle.
-
Assemble Carefully: Tape those PDF pages together, lining up the marks. A rotary cutter gives you crisp edges that feel professional.
-
Mark Clearly: Use tailor’s chalk or a washable pen to transfer notches, bust darts, and grainlines onto your main fabric. If there’s a fold line, mark that too—it’s a lifesaver when cutting.
Accuracy here pays off big time when you start pinning and stitching.
Construction Techniques for a Flawless Finish
Now, let’s get to the fun part—bringing your cami to life:
-
Bust Darts: Fold along the lines, pin from the wide end to the tip, and stitch with a smooth taper. Press them downward to keep things sleek.
-
Straps: Cut these on the bias tape for a bit of stretch. Reinforce them with a double stitch or some lightweight interfacing, then finish with a neat top stitch.
-
Hemming: For light fabrics, roll a ¼-inch hem twice—it’s simple and clean. Curved edges, neckline or bottom look great with bias tape to avoid bulk.
-
Lining: If your cami pattern includes it, cut the lining to match your main fabric. Sew the right sides together at the neckline and armholes, then flip it inside out for seams that disappear.
These steps make your cami look like a boutique, not your sewing table.
Standout Cami Patterns from the catalog Grasser

Ready to try some specific designs? Here are a few camisole sewing patterns from catalog Grasser that we adore:
-
Adjustable Strap Camisole: This one’s got spaghetti straps you can tweak with buttonholes, plus bust darts and a curved hem. It’s a dream with a high-waisted skirt. (Tip: A buttonhole foot keeps those openings tidy)
-
Lace-Trimmed Cami Top: Lace along the neckline adds a delicate touch. The guide walks you through French seams, perfect for sheer stuff chiffon. (Tip: Baste the lace first so it stays put)
-
Everyday Cami with Hidden Pockets: Welt pockets hide in the side seams, and there’s a solid tutorial for sturdy pocket bags. (Tip: Interface the openings for shapes that last)
Below is a selection of top sewing patterns along with concise descriptions:
-
Longsleeve, №1173: A refined design for a long-sleeve top that offers a sophisticated yet practical option for cooler days.
-
Sundress in Four Options, №1143: A flexible pattern featuring four distinct variations, letting you choose the ideal silhouette for a breezy summer look.
-
Top, №1072: A timeless design updated with modern details, perfect for everyday wear and serving as a wardrobe essential.
-
Corset, №1042: A corset-inspired top that highlights your figure with meticulous detailing, delivering a structured and elegant finish.
-
Top, №1039: A light and versatile design suitable for both casual outings and more polished ensembles.
For more inspiration, explore Grasser’s full range of top sewing patterns — there’s a design to match every skill level.
Advanced Techniques for a Tailored Fit
Once you’ve got the basics down, tweaking your fit takes it to the next level. These adjustments work across all kinds of sewing patterns for camisoles:
-
Full Bust Adjustment (FBA): Got a fuller bust? Slash the pattern at the bust line, spread it for extra width, and redraw those bust darts.
-
Reduce Neckline Gape: If the neckline feels loose, pinch in ⅛ inch at the front or add a tiny dart at the shoulder.
For a polished inside, try these seam finishes:
-
French Seams: Great for lightweight fabrics—they hide raw edges completely.
-
Hong Kong Finish: Bind edges with bias tape for a durable, unlined cami.
And don’t skip pressing! Use a tailor’s ham for curves, the bust or armholes, and a pressing cloth for delicate silk or jersey. It’s the secret to that perfect fit.
Final Touches: Elevating Your Cami
This is where you make it yours:
-
Embellishments: Add lace trim, a bit of embroidery, or some beads to the neckline or straps.
-
Sustainability: Dig into your stash—old scarves or thrifted fabrics can become a one-of-a-kind cami.
-
Fit Check: Try it on before the final hem. Tweak the strap length or side seams if needed.
Oh, and one last tip: always download the PDF of your chosen cami top sewing pattern from a trusted spot Grasser. It’s the foundation of a great sew.
Conclusion: Stitch with Confidence
Sewing a cami is about more than just making a top—it’s about creativity and owning your craft. Every stitch builds your skills, mixing art with precision. When you dive into cami sewing patterns, you’re opening up a world of wardrobe possibilities. Whether it’s the simple Adjustable Strap Camisole or the fancy Lace-Trimmed version, a little patience turns fabric into something you’ll treasure.
For a top-notch cami top pattern in PDF format, swing by the Grasser collection. Grab your needle, thread, and imagination—happy sewing!