TABLE OF CONTENT:
- THE SIZE OF THE WOMEN'S PATTERN
- THE 'S PATTERNS
- THE SIZE OF THE MEN'S PATTERN
- THE MEN'S PATTERN
- THE SIZE OF THE CHILD'S PATTERN
- SIZE FOR LINEN
- SIZE FOR PREGNANT WOMEN
- SHOE SIZE
- THE SIZE OF THE HEADDRESS
- SIZE FOR PETS
HOW TO TAKE MEASUREMENTS CORRECTLY AND DETERMINE THE SIZE OF A WOMAN'S PATTERN
To choose the right pattern size, you need to measure yourself and compare your measurements with the standard ones. To choose a pattern, you will need three basic measurements: Chest, Waist, Hip, and one additional Upper arm.
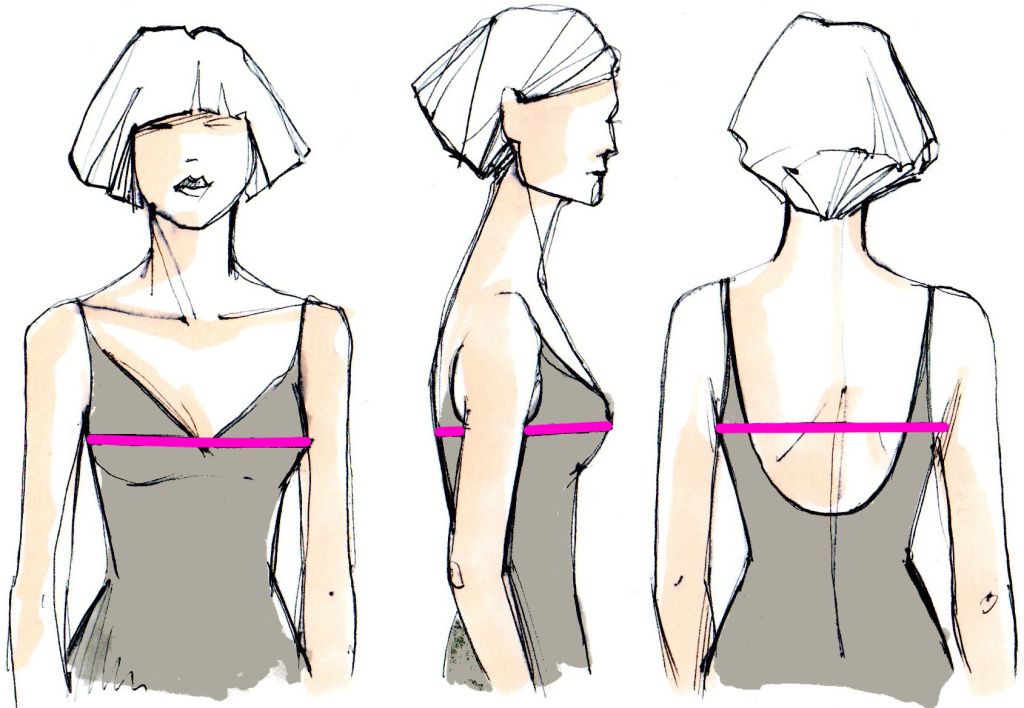
1. Bust – measure your full chest circumference. The tape should run horizontally around the torso, through the protruding points of the breast glands.
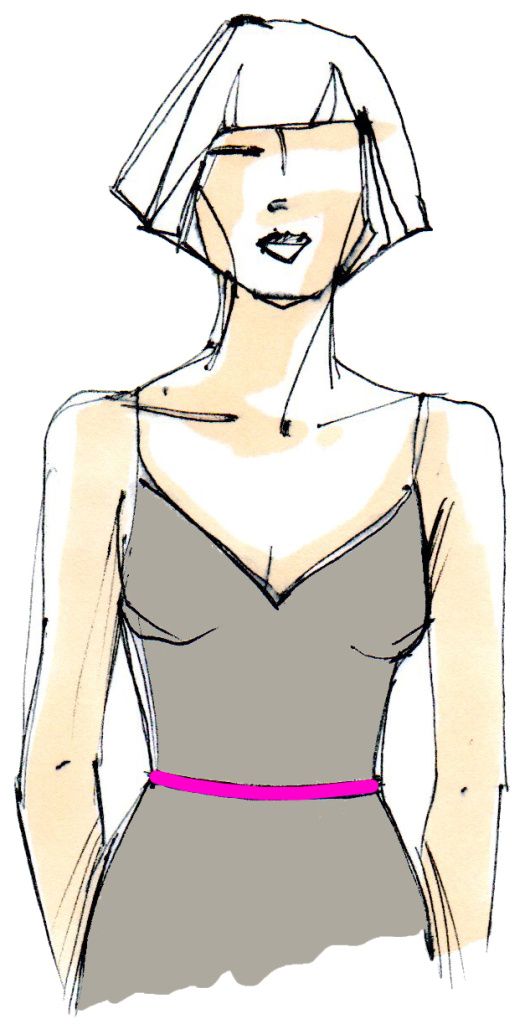
2. Waist – measure your full waist circumference. The ribbon should run horizontally around the torso, at the level of the waistline.
*To properly take measurements, a fitting belt (elastic band) should be tied on the natural waistline.
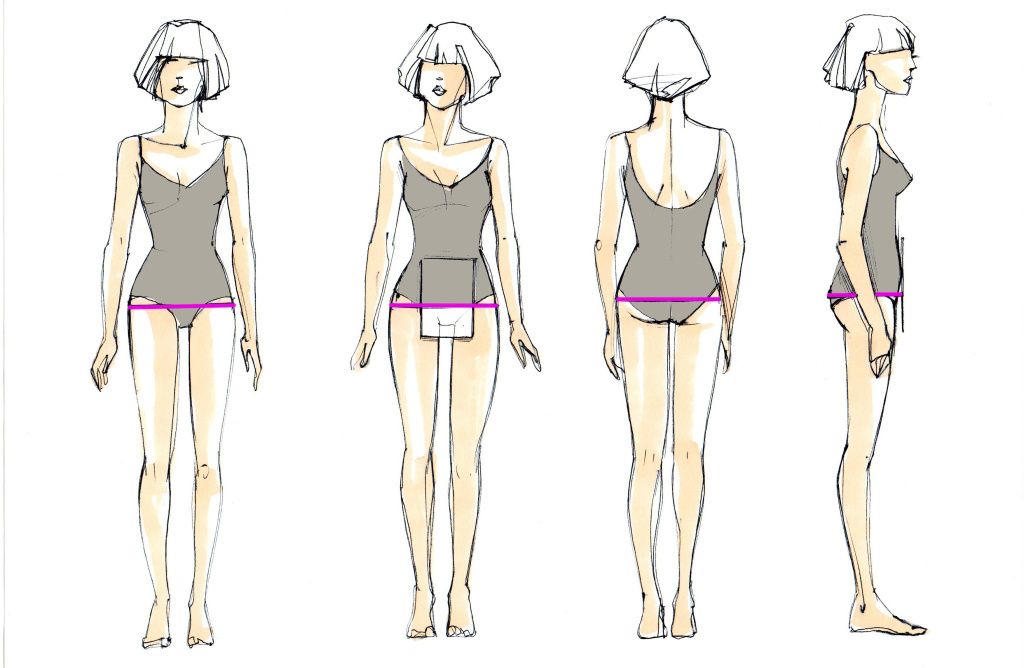
3. Hips – measure the full circumference of the hips, taking into account the protrusion of the abdomen, using a ruler or a sheet of cardboard. They must be placed on the stomach perpendicular to the floor. The tape should run horizontally around the torso, above the sheet or ruler, and from behind along the most prominent points of the buttocks.
4. Upper arm (for shoulder garments) – measured with the arm freely lowered. The tape should run at the level of the armpits.
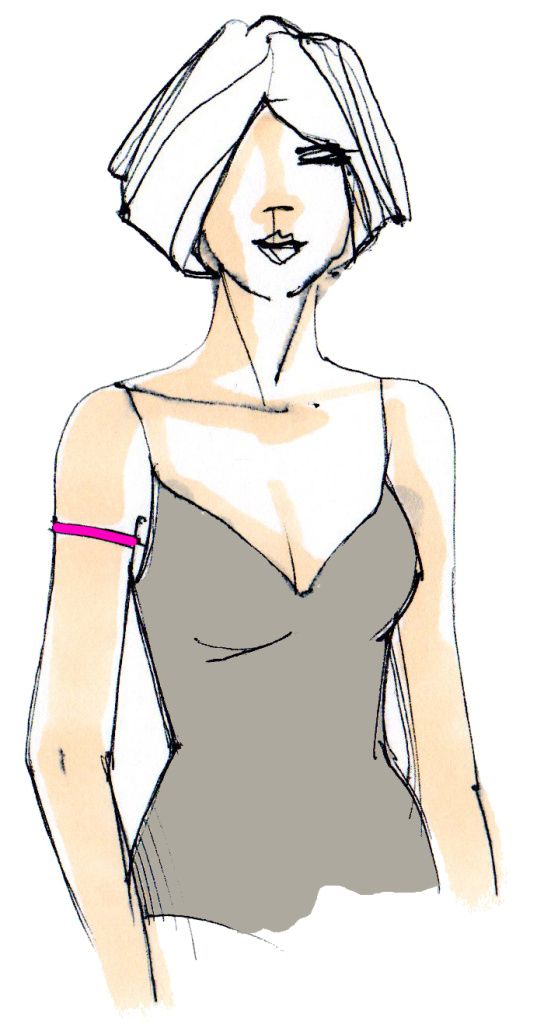
These are the basic measurements that you need to determine your size. Compare your measurements with the standard measurements.
The difference between your measurement and the standard one is acceptable up to 2 cm, both in minus and plus.
For shoulder garments (dress, blouse, coat), the main size selection is made by measuring the bust. For example, your bust is 84 cm. We divide 84 cm in half and get a typical size: 42.
For waist garments (skirt, trousers), the defining measurement is the hip circumference.

** The size attributes in the tables are indicated for the 152-158 cm and 176-182 cm. According to the OST-81, the waist and shoulder girth is higher in smaller tall
HOW TO CHOOSE THE RIGHT BUYING A PATTERN
MANY GRASSER WOMEN'S PATTERNS ARE AVAILABLE IN THREE TO FIVE
When choosing a you can focus on your overall >
If you have a marginal example, 164 cm, 170 cm, 176 cm, etc., then we recommend making a choice in favor of a larger for example, if the , then it is better to choose a range of 164-170.
You can use additional measurements to select the most accurate
To do this, you will need BLW and FLW measurements. Since when choosing the pattern, you need to rely on the length of the body from the base of the shoulder to the waist.
BLW - It is measured from the highest point of the shoulder seam to the waistline at the back. The measurement is performed parallel to the spine, taking into account the bulge of the shoulder blades.
FLW - It is measured from the highest point of the shoulder seam at the base of the neck through the protruding point of the breast (through the nipple point for men) and then parallel to the midline of the body to the waistline.
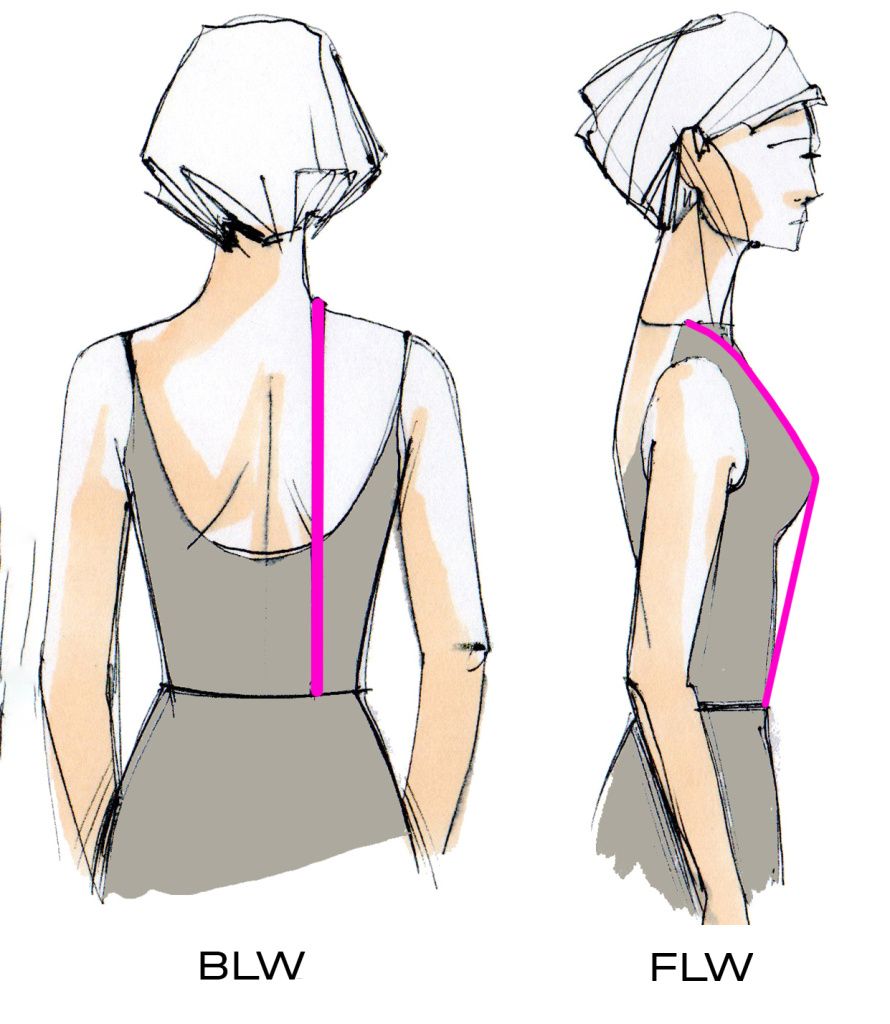
Take measurements and compare your measurements with GOST:

BASIC MEASUREMENTS FOR CHOOSING THE SIZE OF A MEN'S PATTERN:
To choose the right size for a man's pattern, you need to take measurements of Chest, Waist, and Hips and compare the measurements with the standard ones. The difference between your measurement and the standard one is acceptable up to 2 cm, both in minus and plus.
For shoulder garments (T-shirt, shirt, coat), the main size selection is made by measuring the chest circumference. For example, your chest is 100 cm. We divide 100 cm in half and get a typical size: 50.
For waist garments (trousers, shorts), the defining measurement is the hip circumference.
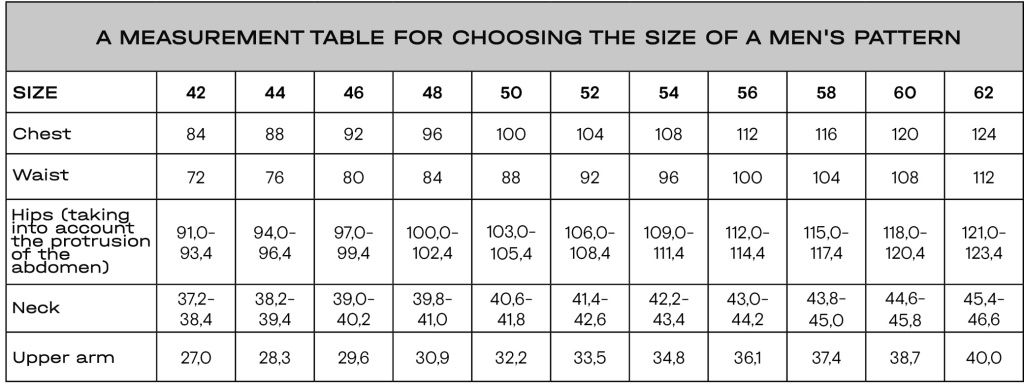
** The size features in the tables are indicated for the -194 cm.
The choice of men's patterns is similar. You can use additional measurements to select the most accurate ; To choose the desired growth range most accurately, you need to know the measurements of BLW, FLW.
BLW - measure the distance from the base of the neck to the waistline from the back parallel to the spine.
FLW - the distance from the base of the neck through the nipple point to the waistline in front is measured.
Take measurements and compare your measurements with the typical ones:

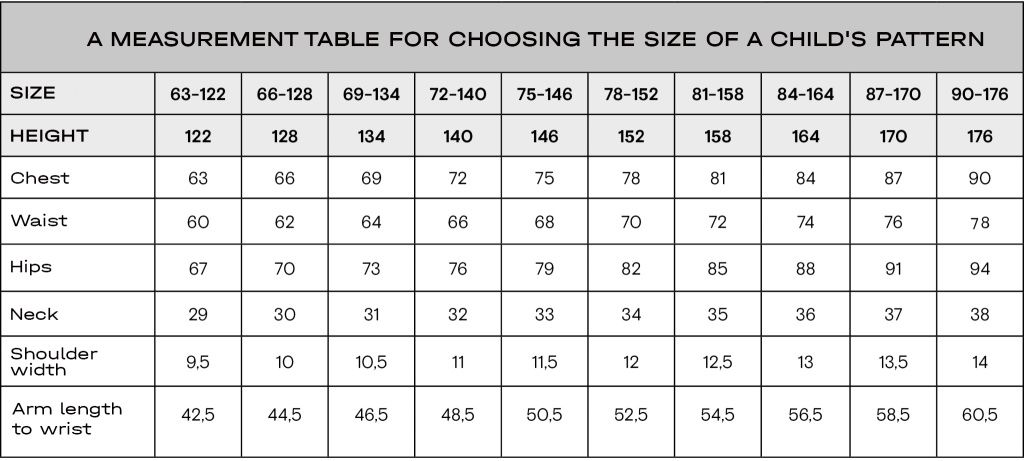
BASIC MEASUREMENTS FOR CHOOSING THE SIZE OF A CHILD'S PATTERN:
To choose the right size for a child's pattern, you need to take measurements of Chest, Waist, and Hips and compare the measurements with the standard ones. The table also shows additional measurements of Neck, Shoulder width, Arm length to wrist. The difference between your measurement and the standard one is acceptable up to 1 cm, both in minus and plus.
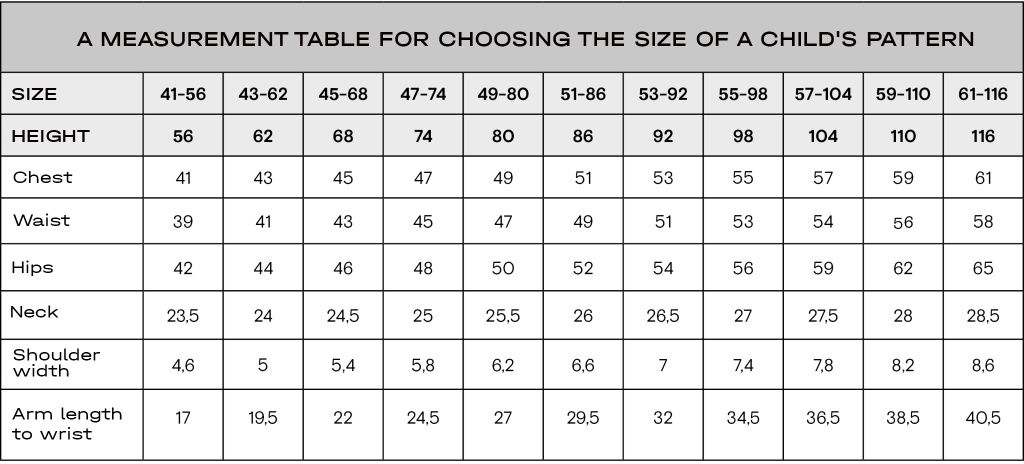
CHOOSING THE SIZE FOR UNDERWEAR
The size of a bra is determined by two dimensional features:
1. Bust – measure the full breast circumference. The tape should run horizontally around the torso, through the protruding points of the breast glands.

2. Girth under the breast – Measure the full girth under the breast. The band runs horizontally, fitting snugly to the body, under the base of the breast glands.
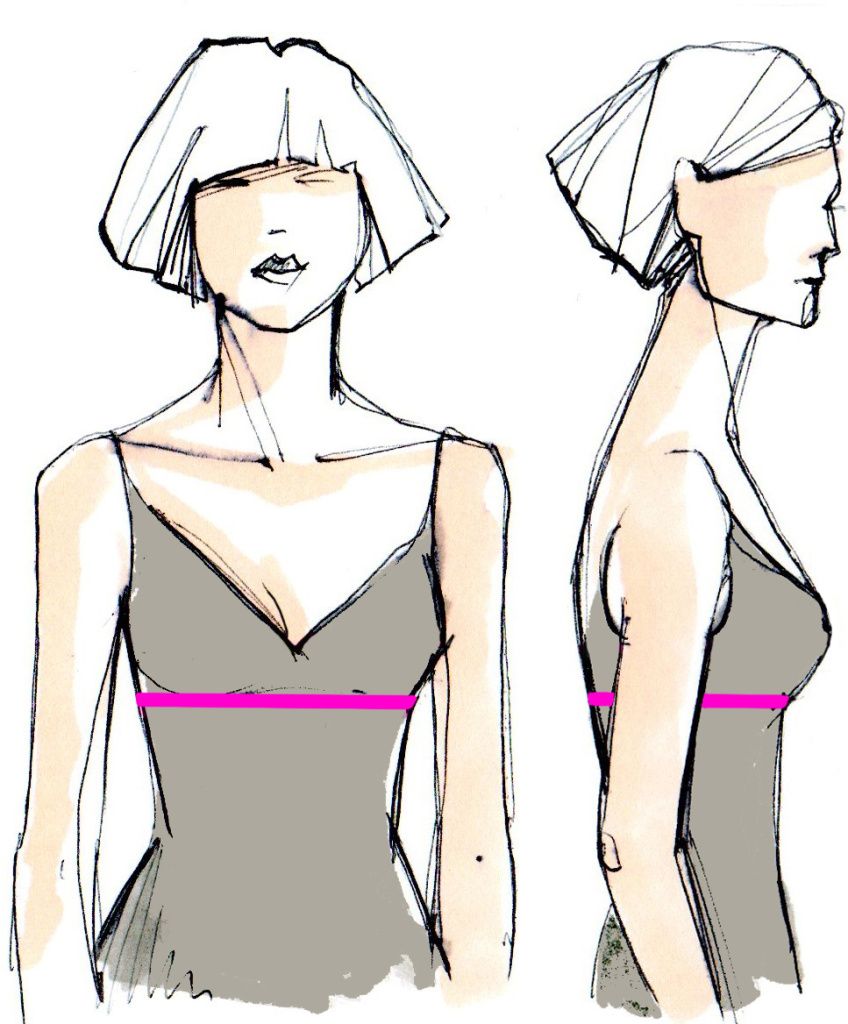
The size is marked as follows – 70A, 80C.
- In the marking, the number indicates the High Bust (HB).

- In the labeling, the letter of the Latin alphabet indicates the fullness of the cup. To determine the fullness of the cup, perform the calculation using the formula:
Cup Size = Bust-HB
Compare the resulting value with the table value to determine the cup size.
If the value is intermediate, choose a larger size.

The following size grid of bras is presented on our website:
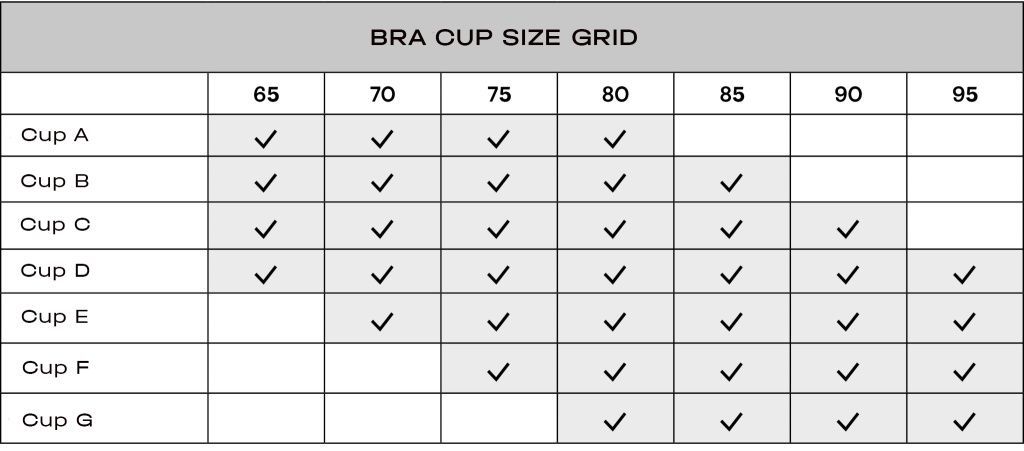
The table shows all possible sizes. To clarify the size grid of a particular model, check the information on the pattern’s page.
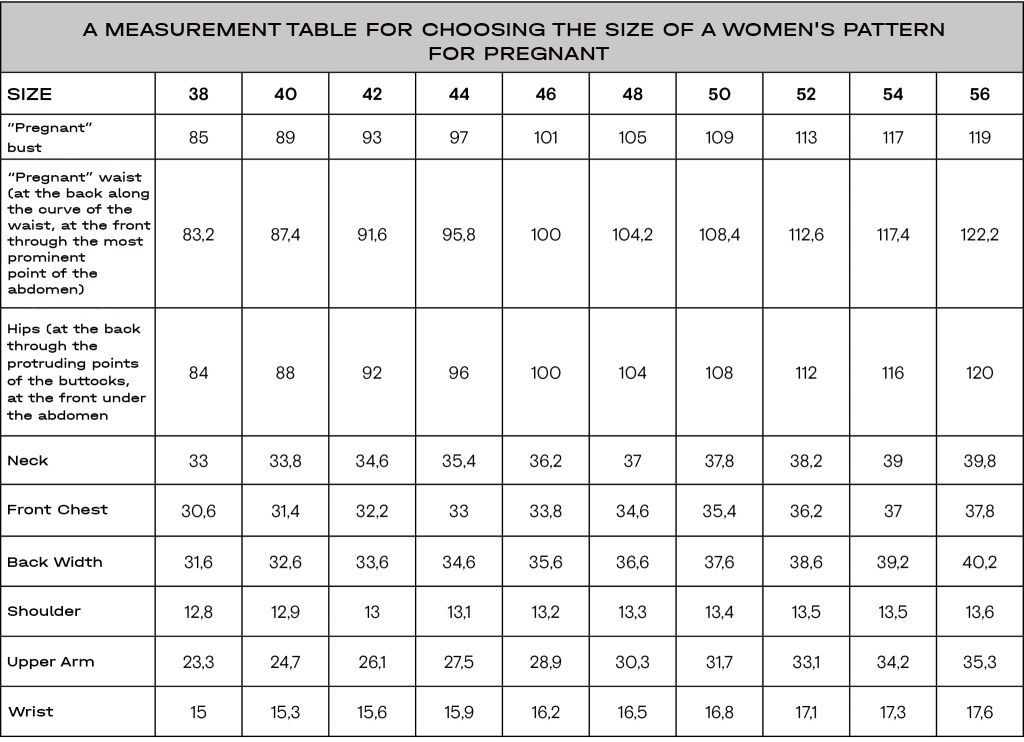
CHOOSING THE SIZE FOR PREGNANT WOMEN
The breast and waist circumference of pregnant women increases, while the remaining size characteristics remain very often in the "pre-pregnancy" range. To choose the right size of the GRASSER pattern for pregnant women, you must first take all measurements, and then, based on all the measurement parameters, determine your size in the table below.
CHOOSING THE SHOE SIZE
Measure your foot length in centimeters and determine your shoe size from the table:

CHOOSING THE SIZE OF THE HEADDRESS
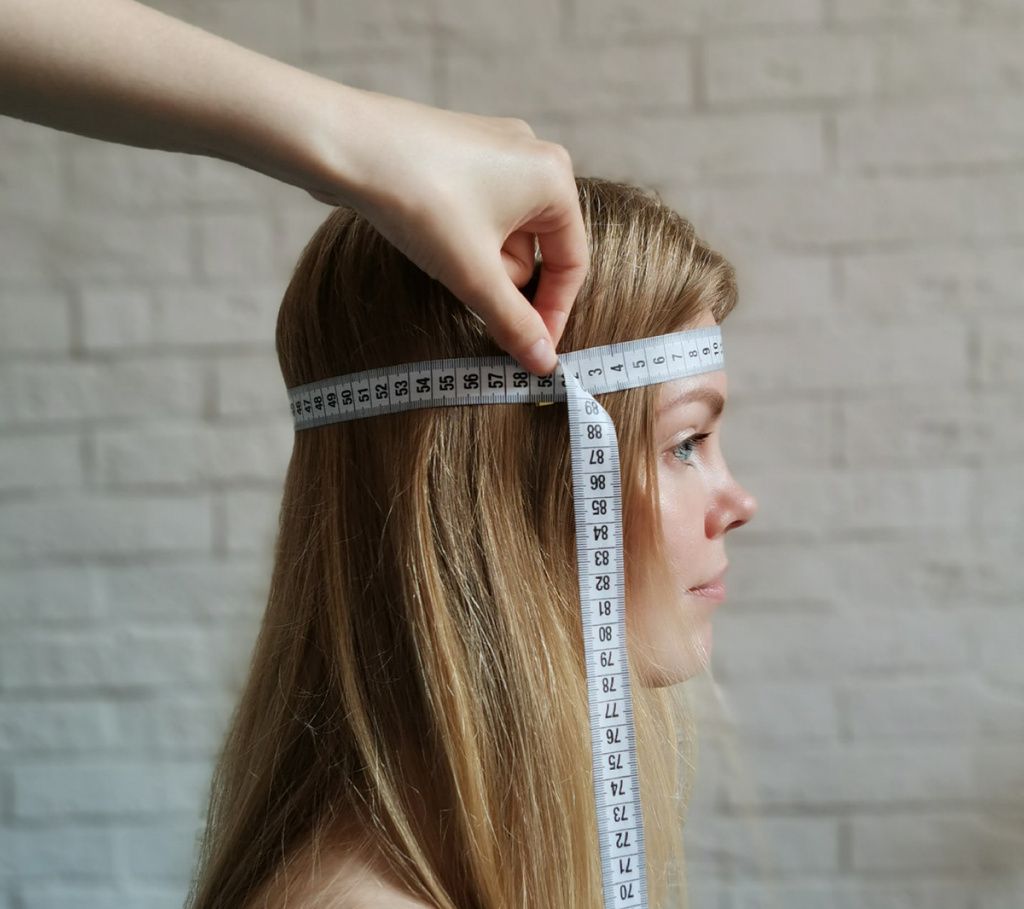
The size of the headdress is equal to the circumference of the head.
Take a tailor's centimeter and wrap it around your head. Place a centimeter above the eyebrows by one and a half or two centimeters, slightly above the auricles, so that it passes through the most prominent point on the back of the head. Determine the maximum head circumference. The centimeter should fit the head tightly enough, but without tension.
CHOOSING THE SIZE FOR DOGS (CATS)
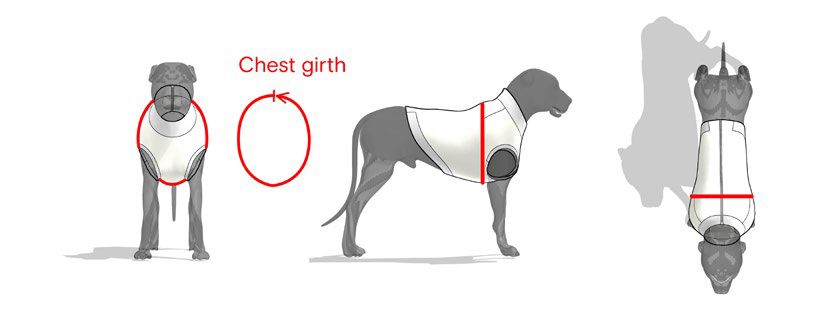
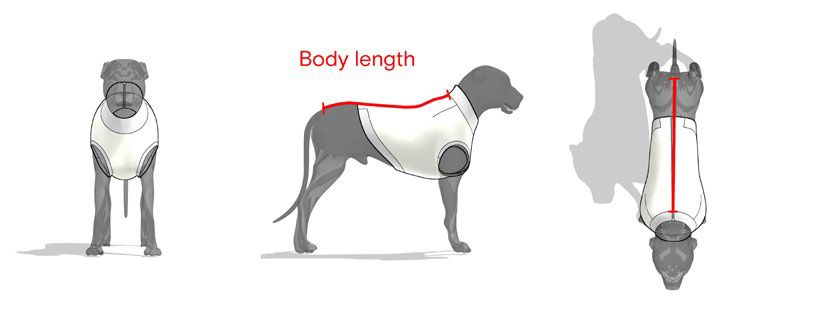
The size of clothes for dogs and cats is determined by two parameters:
1. Chest – measure the full chest circumference. The tape runs around the body at its widest point behind the front paws.
2. Body length – measure the length from the base of the neck to the beginning of the tail.
Fig. 1 - Chest, Fig. 2 - Body length
On our website the size is recorded:
- chest in Latin letters XS, S, M, L, XL
- the body length is in numbers 1,2,3.
Size example: S-2, XL-3.


